Tuesday 9 October 2018

How to Sync Music from iTunes to iPod 2019


How to Sync Music from iTunes to iPod 2019

As mentioned above, you can transfer all sorts of digital music on to your iPod through the iTunes software. It should be in a format that is supported by your iPod, preferably in MP3 format.
1 How to Automatically Sync Music from iTunes to iPod

In order to automatically transfer digital music to your iPod, follow these simple steps.

Step 1: Open the music menu that can be found on top of the iTunes window.

Enable the Sync music option by ticking the box next to it.

Step 2: In the event, you want to sync all your music files on to your iPod, locate the entire music option and select it.

Step 3: To selectively transfer music files, choose the option that says select playlists, artists, albums, genres.


Finally, confirm your selection by pressing the apply button and let the syncing process begin.
2 How to Manually Sync Songs from iTunes to iPod

To manually transfer all your music files through iTunes, you need to change some configuration settings first.

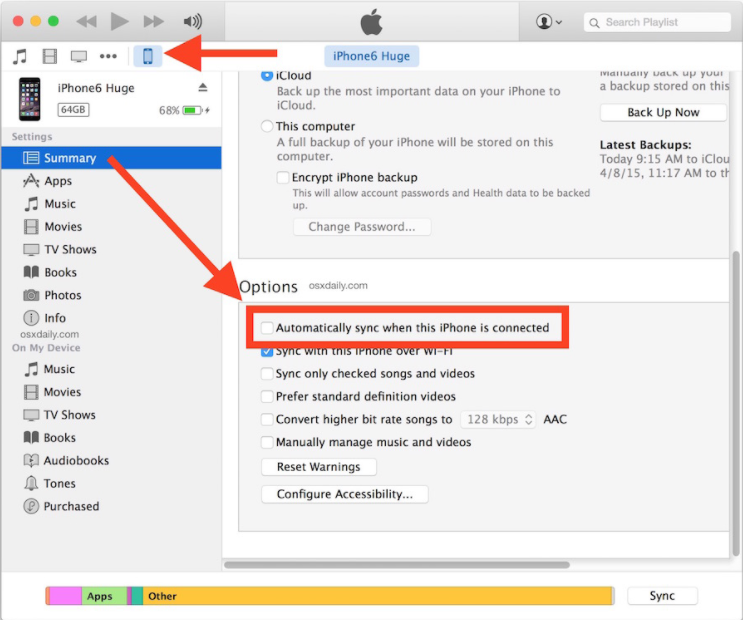
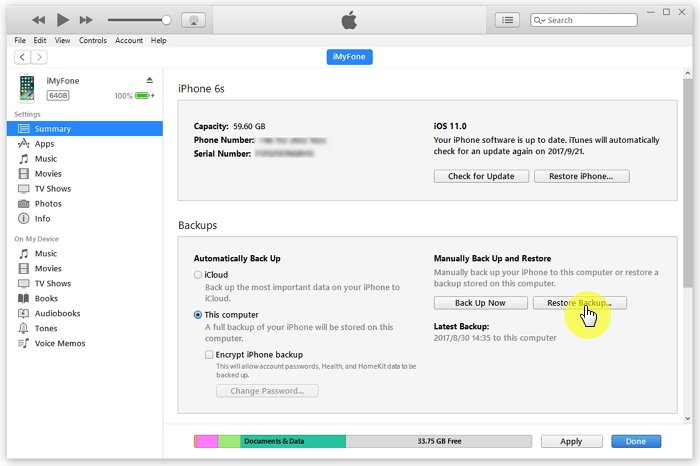
Step 1: Go to the summary tab which can be found on top of the main iTunes window.

Step 2: Select the manually manage music option and confirm your selection by pressing apply.


You have successfully altered the configuration settings of iTunes to transfer music manually. Let’s proceed to the next step.

Step 3: Locate the Music pane underneath the iTunes library.

Step 4: Select all those songs that you want to transfer to your iPod from the iTunes panel. You can select multiple songs by holding down the CTRL key. After you’re done selecting the songs that you want manually sync to your iPod, drop them in the iPod icon, on the left side of the iTunes window. Click on apply and let the magic happen.
Limitations and Drawbacks of Synchronization through iTunes

Although the iTunes software is the go to software for syncing files, it has its drawbacks. It is unable to transfer a large number of media formats such as AVI, XVID etc. If you want to transfer media on to your computer from you Apple device, iTunes will not let that happen. You can use alternative file transfer software to bypass these limitations. We have just the one for you.

Gihosoft Photo Eraser Erase unwanted objects and perfect your amazing photos!

If you lost data after you updated to a new iPhone, you can always use Gihosoft iPhone Data Recovery to get the data back from the old iPhone or backup.

Jihosoft Photo Eraser

Free iTunes/iPhone Backup Extractor for iPhone, iPad

iPhone Backup Extractor - Extract Data from iPhone Backup

You may also like:online youtube downloader

Wednesday 29 August 2018

How to Import Contacts to Gmail from iPhone


How to Import Contacts to Gmail from iPhone

Method 1: Backup Contacts to Gmail from iPhone with Settings

You can import contacts to Gmail directly using your iPhone Settings. This is actually the easiest method. There are two options for this method. We have described them below:
Option 1: To Your Existing Gmail Account

If you already have a Gmail account, you can easily backup contacts to Gmail with the simple steps we have outlined below:

Step 1: Launch your iPhone Settings, tap “Mail, Contacts, Calendar”.

Step 2: Select Add Account and then tap Google. Choose your Gmail account.

Step 3: Toggle on Contacts. Choose to keep your iPhone contacts for syncing to be possible. Wait for the process to complete.


If you want Gmail to be the default contacts account, follow the steps below:

Step 1: Launch Settings and tap “Mail, Contacts, Calendar”.

Step 2: Under contacts, click Default Account. Choose your Gmail account.


Option 2: To A New Added Gmail Account

If you don’t own a Gmail account, you can still create a new one then use it to sync contacts to Gmail. The process is simple, you need to follow the simple steps below:

Step 1: For iOS 10.2 and below: Open Settings, tap “Mail, Contacts, Calendars”, and then click Add Account. For iOS 10.3 and above: Open Settings, click Contacts, tap Accounts, click Add Account.

Step 2: Choose Google on the next Page. Fill in your Gmail credentials and then click Next. Toggle on Contacts.You may also like:Gihosoft iPhone Data Recovery

Must Read:Gihosoft Free Android Data Recovery

Must Read:Jihosoft iTunes Backup Unlocker
Jihosoft iTunes Backup Extractor free is a powerful tool to recover and extract important data from iPhone, iPad & iPod touch backup on Windows or Mac.
You may also like:
Gihosoft Total Video Converter is a professional all-in-one video tool that enables you to convert videos and audios into various different formats.
You may also like:online youtube downloader


Method 2: Sync Contacts to Gmail from iPhone via iTunes

iTunes allows iPhone users to import contacts to Gmail quite easily. If you prefer using this method instead of method 1, follow the steps below:

Step 1: Using a USB cable, connect your iPhone to a computer and launch iTunes.

Step 2: Choose “Sync Contacts with Google Contacts” under the iTunes Info tab.

Step 3: When prompted, enter your Gmail credentials. All your contacts will be synced to Gmail.

Step 4: Go to visit www.gmail.com, then Gmail >Contacts to have a check.


Method 3: Transfer Contacts to Gmail from iPhone via iCloud

To be able to backup contacts to Gmail via iCloud, your contacts have to be available on iCloud first. To make sure your iPhone contacts are synced with iCloud, follow the simple steps outlined below:

Step 1: Launch Settings, tap [your name] and click iCloud.

Step 2: Toggle Contacts on under iCloud.


Now that you have synced your contacts with iCloud, follow the steps below to sync contacts to Gmail via iCloud:

Step 1: On a computer web browser visit iCloud.com and log in using your credentials.

Step 2: Tap Contacts and then choose the contacts you wish to import to Gmail.

Step 3: Tap Settings icon (Gear Icon) and then select Export vCard.

Step 4: On your web browser, visit Google Contacts and sign in using your email address and password.

Step 5: Tap “Import Contacts…” and then tap Choose File. Select the vCard you exported in step 3 above. When the vCard is uploaded (usually takes seconds), all your contacts should be imported to Gmail.


Monday 20 August 2018

How to Photograph Waterfalls with an iPhone

How to Photograph Waterfalls with an iPhone


Here’s our guide to getting the perfect shot the next time you go chasing waterfalls.


Iguazu Falls, Argentina
Best weather for photographing waterfalls with an iPhone


While you might think a sunny day is ideal weather for locking in those memories and getting the perfect shot of a waterfall, that may not always be the case. Bright sunlight can sometimes result in the water looking like one big white blob, with none of the detail you can see in person. The ideal weather to photograph waterfalls with an iPhone is actually more overcast: even rainy days can sometimes be ideal!


Of course, most of the time you’ll want to go exploring when the weather’s nice, so if you can, save picture time until the afternoon or evening, or wake up extra early and get some amazing sunrise shots.


Dusk at Seljalandsfoss, Iceland
Best angles for photographing waterfalls


The rule of thirds is something you’ll hear about all the time when you’re talking photography. It states that a photo is more visually interesting when its subject isn’t directly in the centre of the shot. So what does that mean for taking pictures of waterfalls?


Try to add some interest to your shot by including some of your surroundings: most of the time, waterfalls are surrounded by all kinds of gorgeous nature! By including a tree, or part of the cliff the waterfall runs down, your photos will have that certain artistic quality you find in professional photography.
Best equipment for photographing waterfalls with an iPhone


Most of the time, you’ll want to pack light if you’re on the hunt for incredible hidden (and not-so-hidden!) waterfalls. We aren’t suggesting you bring a whole photographer’s studio with you, but there are a few small things you can add to really make your photos pop.


Apple’s Live Photo setting allows you to create moving images: the camera captures 1.5 seconds of movement before and after you take the photo, which results in three seconds of movement. This is a great way to show off the power and movement of the falls, but it also gives you the option to play with long exposure: the still image is all 3 seconds of movement stitched together, and it can create beautiful blurring effects.


If you’re experimenting with long exposure, the most important thing to remember is your phone needs to be perfectly still while the photo is being taken. If you think you might have a problem with that, or you just want to make sure everything goes perfectly, there are tons of portable tripods you can get to keep things stable.


A partial cliff at Milford Sound, New Zealand
Get in the frame


Don’t be afraid to step in front of the camera! Whether it’s to show the scale of a massive waterfall, or just to show off your traveller’s tan, including yourself in your waterfall photos is a sure-fire way to make memories and have photos you’ll want to keep forever.
Milford Sound - photograph waterfalls with an iPhone


Best waterfalls to photograph with an iPhone


Any time you stumble upon a waterfall, it’s an almost magical moment. You can find lush greenery, jagged rocks, or even a secret swimming hole; sometimes all at the same time! While these tips work great for any waterfall, here are a few of our favourite ones.
Niagara Falls, Canada and the USA


This world-famous waterfall is actually three waterfalls that sit along the border of Niagara Falls, Ontario, and Niagara Falls, New York. Horseshoe Falls, the American Falls, and Bridal Veil Falls (fitting, since Niagara Falls was once known as “the honeymoon capital of the world”) make up this incredible sight.

For now, check:Free iTunes/iPhone Backup Extractor for iPhone, iPad

Jihosoft iTunes Backup Extractor free is a powerful tool to recover and extract important data from iPhone, iPad & iPod touch backup on Windows or Mac.
Jihosoft Android Data Recovery: the best Android Data Recovery software for Windows and Mac to recover deleted contacts, messages, photos, videos, WhatsApp and etc from Android devices.
If you can’t sync with iTunes and want to rescue data from a disable iPhone, you could try Gihosoft iPhone Data Recovery. Also feel free to ask questions on the iDevice is disabled error in the comments section below.

Friday 17 August 2018

How to Restore iPhone Photos not Showing up on PC


How to Restore iPhone Photos not Showing up on PC


Part 1: The Five Common Solutions


Part 2: The Best and Easiest Solution
The Five Common Solutions

Many iPhone users cannot access their iPhone pictures on the computer while some iPhone users can only the access few iPhone pictures. Thus, iPhone not showing photos on computer problem is a normal experience for iPhone users. To resolve this problem, here are some steps to resolve iPhone photos not showing up on PC:
1Reboot Computer and Restart Your iPhone

This is the easiest method to restore iPhone photos; this method will not delete any file on your iPhone.
2Change the USB Port of Your PC

You can try other USB port if you have anyone.
3Unlock Your iPhone

Ensure that your iPhone is unlocked and has trusted computer. If your iPhone is locked, the camera roll containing all your photos will be empty. Try to disconnect your iPhone and unlock your iPhone screen, connect your iPhone back to the computer. After few minutes, the iPhone photos not showing up on PC problem will be solved.


4Authorize the Computer

Step 1: Connect your iPhone with a USB cable.

Step 2: Click on iTunes main menu.

Step 3: Open account authorizations.

Step 4: Authorize your computer.

Step 5: Insert your username and password. Then, you can now see the photos showing on your computer.


5 Restore iPhone with iTunes

Step 1: Click on iTunes on your computer used to back up your device.

Step 2: Use your USB cable to connect your iPhone to your computer.

Step 3: Choose your iPhone when it appears in iTunes. If your device does not display on iTunes, tap on learn more.

Step 4: Click on restore backup in iTunes.

Step 5: Check the size and date of each backup and select the most relevant.

Step 6: Tap on restore and wait for few minutes to finish.

Step 7: Make sure your device is connected after it restarts and wait for some minutes to sync with your computer. You can disconnect your device when the sync is complete.If you can’t sync with iTunes and want to rescue data from a disable iPhone, you could try Gihosoft iPhone Data Recovery. Also feel free to ask questions on the iDevice is disabled error in the comments section below.

You may also like:


How to Rescue iPhone Photos and Videos When Stuck in Recovery Mode


How to Get iMessage on Windows PC


4 Easy Ways to Transfer Photos from iPhone to Computer

Sponsor Ads:
Jihosoft Android Data Recovery: the best Android Data Recovery software for Windows and Mac to recover deleted contacts, messages, photos, videos, WhatsApp and etc from Android devices.


Tuesday 14 August 2018

How to Unlock iPhone 5/5S/5C for Free


How to Unlock iPhone 5/5S/5C for Free
Part 1. Forgot Your Old iPhone Passcode? Unlock It with iCloud


Actually you can unlock your iPhone 5/5S/5C for free using the Find My iPhone function. It is an app that is added to all Apple phones to help you protect your phone. If your phone is ever lost or stolen, the app can help you to locate it (as long as it is turned on). But a lot of people don’t realize that Find My iPhone can also be used to unlock your phone. Here’s how:


Here are the steps when you forgot password on old iPhone:


Step 1: On an Apple device that is NOT the device you wish to unlock, download and install Find My iPhone.


Step 2: Enter your Apple ID and password. Once logged in, you will see a list of all devices related to that account.


Step 3: Choose “All Devices” and click on the device you wish to unlock.You may also like:


iPhone backup unlocker:Recover iTunes Backup Password.


iPhone backup extractor :The best iPhone Backup Extractor software to extract photos, text messages, contacts, voice memos, note, WhatsApp, Viber and etc from iPhone/iPad backup


Gihosoft Free iPhone Data Recovery is a professional iPhone Data Recovery software to get back all your lost text message, photo, video, call history, note, contact and more from iPhone/iPad/iPod Touch. It offers a full solution to recover your lost data in different tough situations. Besides recovering data directly from iPhone, iPad and iPod touch, it also allows you to recover data from iCloud and iTunes backup files.


Step 4: Follow instructions and choose “Erase iPhone”. This will unlock your iPhone 5/5S/5C for free in just seconds.


Note to users: Unlocking your iPhone with Find My iPhone is simple if you have turned on it on your iPhone, but it does erase all of your data. If you use this method make sure you have all of your data backed up on iCloud for restoration, or ensure that you are okay with losing it.

Sunday 12 August 2018

How to connect an external keyboard to your iPad 2019 Guide

How to connect an external keyboard to your iPad 2019 Guide


Why use an external keyboard with iPad?

iOS fully supports external hardware keyboards, and even lets you choose the language and layout of a connected keyboard. That makes it easy to just hook up any keyboard and start typing. Apart from offering physical keys to tap on, using an external keyboard with your iPad brings several other advantages:


The on-screen keyboard slides down, letting the current app(s) use the the full screen. This gives you a whole lot more space for viewing your document. It also makes split-screen multitasking more practical.


Keyboard switcher. If you hit ⌘-TAB on a connected keyboard, you’ll see the same app switcher that you see on the Mac. This lets you quickly switch apps, and even return to the home screen, all from the keyboard.


Keyboard shortcuts. Many apps have added support for keyboard shortcuts. At the very least, you’ll get the standard copy and paste shortcuts (⌘C and ⌘V). But some apps, like Things, let you control pretty much everything from the keyboard. To see what shortcuts are available, hold down the ⌘ key.

The iPad’s Mac-like app switcher is only available when you use an external keyboard.

Photo: Cult of Mac

Connecting Bluetooth keyboard to iPad

The most likely kind of keyboard you’ll connect is Bluetooth. These are convenient, and perfect for the iPad (which requires a dongle to plug in a USB keyboard). The pairing process for a Bluetooth keyboard varies from model to model, but on the iPad (or iPhone), you will find the keyboard in Settings > Bluetooth. Just put the keyboard into pairing mode, then — when its name shows up in your Bluetooth settings — tap to pair. That’s it. After this initial pairing, the iPad will connect to the keyboard whenever you switch it on, and the on-screen keyboard will be hidden.
Connecting USB keyboard to iPad

Apple’s dongle lets you connect all kinds of USB accessories to your iPad.
You may also like:

If you ever lost or accidentally deleted data from your iOS device, you can use the professional Gihosoft iPhone Data Recovery software to retrieve important data from iPhone, iPad or iPod Touch even without backup.
Jihosoft iPhone Backup Extractor Extract and recover all types of data from iPhone backup files, such as camera roll photos, videos, SMS, contacts, reminders, WhatsApp, and etc.

Wednesday 8 August 2018

How to Fix FaceTime Unavailable with iOS 12?

How to Fix FaceTime Unavailable with iOS 12?
1 Check whether FaceTime is Available in Your Country

If you have bought your iOS device from Saudi Arabia, UAE or from Pakistan, FaceTime feature might not be available in your country. However, if you use a device that runs on iOS 12 and you have purchased it in Saudi Arabia, you can now enjoy FaceTime.
2Check FaceTime & Restriction Settings

If FaceTime is already disabled in your iOS device, you will have to turn it on. Here’s how to do it.


Go to the Settings App located on your device’s Home Screen.


Select FaceTime.


Now, find the switch located next to FaceTime and turn the switch on.


If restriction was the problem, FaceTime should work by now.


3Reset Network Settings

Sometimes, if your network settings are changed or it has some kind of an error, you will be not able to use FaceTime properly. Here’s how to fix network settings of the iPhone.


Go to Settings app on you iOS device.


Select the option called General.


Tap Reset and tap on Reset Network Settings.


When prompted, you will have to confirm the massage to reset the network settings of your iPhone


Once the iOS device is rebooted, the network settings will be reset and you will be able to use FaceTime feature.


4Change Another WiFi Connection

If there is a trouble with your existing Wi-Fi connection, FaceTime keeps failing can be a frequent issue. So, it is worth trying a new Wi-Fi connection. Here’s how to change your Wi-Fi connection.


Go to the Settings app located in your device’s home screen and select Wi-Fi option.


You should turn on Wi-Fi. If it is already turned on, you will see the available connections.


Now, tap on the new Wi-Fi network you need to connect to.


You should provide the password of the respective Wi-Fi network in order to join.


Once joined, the device will notify it with a ‘right’ mark just next to the network.


5 Restart Your Device

You can also try restarting your device and see if FaceTime works. The purpose of restarting your iPhone is to fix some minor issues. Here’s how to restart your iOS device.
If you are using an iPhone X:


Press the side button and any volume button simultaneously and hold them.


Once the slider appears, drag it to turn the iPhone X off.


Now, you should press and hold the Side button until the Apple logo appears on the screen.


If you are using an iPhone 8 or an earlier version:


Press and hold the Top button until you see the slider.


Drag it to turn the device off.


Once the device is turned off, you should press and hold the Top button to see the Apple logo.


6Reset All Settings

If you believe that there are several issues related to the settings, it is easier to get them all reset. Here’s how to do it.


Go to the Setting app of the iPhone though Home Screen.


Go to General.


Tap on Reset which is located towards the bottom of the screen.


Now, you should find an option called Reset All Settings.


Tap it and enter the passcode when prompted.


During process, if you lost any important data, you can use Gihosoft iPhone Data Recovery. Even if your iPhone stuck in recovery mode, you can also use this software to rescue photos and videos in iPhone recovery mode.


You may also like:Gihosoft Total Video Converter is a professional all-in-one video tool that enables you to convert videos and audios into various different formats. You can also download videos from YouTube or other online video sharing sites and convert them easily. Plus, you’re able to personalize your videos with its inbuilt editor, such as, trimming, cropping, applying video effects, adding watermark, subtitles, and more. If you need a powerful and professional desktop video converter program, just download Total Video Converter and follow the step-by-step guide here to have a try.


Thursday 26 July 2018

How to save Photos in JPEG instead of HEIC on iPhone Running iOS 12 2019

Save Photos in JPEG instead of HEIC on iPhone Running iOS 12

How to save Photos in JPEG instead of HEIC on iPhone Running iOS 12

Step 1. Start the Applying settings on your iOS device.


2nd step. Now press Camera.


Step 3 Then press formats


Step 4 Then select More compatible.


Now your iPhone will take JPEG photos and H.264 videos. However, you will need to go into High Efficiency every time you want to shoot 4K at 60 fps and 1080p at 240 fps.
Automatically convert iPhone / iPad photos to JPEG when transferring to a Mac / Windows PC

The latest versions of iOS allow you to automatically convert HEIC images to JPEG when transferring to Mac or PC.

Step 1. Open Applying settings on your iOS device → Photos.


2nd step. Now scroll down and select Automatic.


That’s about it!

Your catch?

Although “Heek” is not yet widely supported, it is the future. Therefore, I would suggest that you opt for JPEG only when you have to deal with the problem of incompatibility. Do you have questions? Let us know below in the comments.

Photo: Pixabay

Source

Sponsor Ads:

Gihosoft Free iPhone Data Recovery is a professional iPhone Data Recovery software to get back all your lost text message, photo, video, call history, note, contact and more from iPhone/iPad/iPod Touch. It offers a full solution to recover your lost data in different tough situations. Besides recovering data directly from iPhone, iPad and iPod touch, it also allows you to recover data from iCloud and iTunes backup files.

Gihosoft Android data recovery Free is a super awesome software specialized in Android file recovery. With this program, you are able to recover deleted photos, music, videos, messages, contacts, call logs, WhatsApp messages, Viber chat history and more from Samsung, Huawei, LG, HTC, Motorola, Google, Oneplus, Sony, Lenovo, ZTE and other Android devices directly. Meanwhile, this Android data recovery software is available for both Windows and Mac platforms.Sponsor ads:
Gihosoft iPhone Data Recovery Free
Free iPhone Data Recovery Software for Windows/Mac
Recover up to 12+ types of files, including contacts, SMS, photos, WhatsApp, Viber, notes, etc.
Restore lost data from iOS devices directly or from iTunes and iCloud backup
Recover iPhone data lost due to iOS upgrade/jailbreak, accidental deletion, device lost or broken
Support all the latest iPhone, iPad and iPod Touch
Both Free and Pro version.
If you lost data after you updated to a new iPhone, you can always use Gihosoft iPhone Data Recovery to get the data back from the old iPhone or backup.You may also like: iphonerecovery.com
If you use android phones, please choose Gihosoft Android Data Recovery.
With Gihosoft Android Data Recovery, no longer afraid of data loss!
Gihosoft RePicvid Free Photo Recovery Software provides a free photo recovery software for windows to help users recover the deleted or lost photo for free.
Jihosoft Android Data Recovery: the best Android Data Recovery software for Windows and Mac to recover deleted contacts, messages, photos, videos, WhatsApp and etc from Android devices.Tips:How to transfer messages from iPhone to iPhone


Monday 9 July 2018

Unlock Second-Hand iPhone in Recovery Mode 2018

Unlock Second-Hand iPhone in Recovery Mode


On the other hand, recovery mode can also be used to unlock second-hand iPhone. Depending on your iPhone’s model, use one of the guides below.


Step 1. Connect your second-hand iPhone to computer and open iTunes.


Step 2. While your device is connected, follow the steps below to put it into recovery mode:
For iPhone 8, iPhone 8 Plus, and iPhone X


Press and release the Volume Up button quickly once.


Repeat this with the Volume Down button.


Press and hold down the Side button until you see the iTunes logo.


For iPhone 7 and iPhone 7 Plus


Press the Volume Down and Side buttons and hold them down.


When you see the iTunes icon you can release them.


For iPhone 6S and Earlier


Hold down both the Home and Top/Side buttons.


After the iTunes logo appears, release the buttons.


Step 3. When your iPhone is in recovery mode, you will see a window pop up on iTunes. Click “Restore”. This will download the firmware for your iPhone. If it takes over 15 minutes, your device will exit recovery mode. In this case, you need to repeat the steps 2 and 3.


Step 4. Wait for it to finish. Then it’s done, you can set up your device.


Recovery mode takes longer than iMyFone LockWiper, but it still does the job.


Just like that you’ve unlocked your second-hand iPhone. There’s not much to this method and if anything is unclear, there’s plenty of guidance available.Sponsor Ads:


Gihosoft Free iPhone Data Recovery is a professional iPhone Data Recovery software to get back all your lost text message, photo, video, call history, note, contact and more from iPhone/iPad/iPod Touch.


Gihosoft Android data recovery Free is a super awesome software specialized in Android file recovery. With this program, you are able to recover deleted photos, music, videos, messages, contacts, call logs, WhatsApp messages, Viber chat history and more from Samsung, Huawei, LG, HTC, Motorola, Google, Oneplus, Sony, Lenovo, ZTE and other Android devices directly. Meanwhile, this Android data recovery software is available for both Windows and Mac platforms.


How to fix tweaks not showing up in Settings on iOS 11

How to fix tweaks not showing up in Settings on iOS 11


WHY ARE TWEAKS NOT SHOWING UP IN SETTINGS?


Tweaks are working perfectly fine with Electra development toolkit. The real problem lies with the users who are unsure about the whole installation process and are erroneously copying files to incorrect locations.


Even if you install the tweak properly, here’s what you will get in the Settings app.


Although the tweak might work, you can’t install enter its Preference section and apply any changes or Settings.


Here are a few methods you can try to get rid of this bug.
HOW TO GET TWEAKS TO SHOW UP IN THE SETTINGS APP
METHOD 1


Open Filza.


Navigate to this location – /bootstrap/Library/PreferenceLoader.


Create a new folder and name it Preferences.


Copy all files inside the PreferenceLoader folder in the original tweak archive to this new folder (from Step 3).


Ensure you copy other files to their respective locations as well. You can follow the complete tweak installation tutorial here.


Check your Settings now.
METHOD 2


Move the tweak data present in the archive to the root Library (/Library) folder. Not moving this data folder is yet another reason why your tweaks aren’t working properly.


Tweak data refers to any other folder present in the archive except MobileSubstrate, PreferenceBundles, and PreferenceLoader.
METHOD 3


I suggest using this method only as a last resort. The behavior of tweaks is actually not dependent on this jailbreak or the exploit.


Uninstall Electra jailbreak toolkit from your device. If you don’t know how to do that, you can follow this tutorial. This will completely wipe it off of your device.


Re-jailbreak your device with Electra.


Install all compatible tweaks for iOS 11-11.1.2.
METHOD 4


Open Anemone app.


Respring your device.
METHOD 5


Download the tweaksupport.tar package from this link.


Extract PreferenceLoader.dylib and Preferenceloader.plist files from this archive to any location on your computer. These files are required for loading the preferences or Settings section of a tweak. Your tweaks will work like they should but Settings will remain missing if these files aren’t present in the appropriate directory.


Establish an SFTP session with your device via WinSCP.


Go to /bootstrap/Library/SBInject transfer the aforementioned dylib and plist files if they aren’t already present.
METHOD 6 (FOR IOS 11.2-11.3.1 USERS)


Open Cydia and add this repository – http://tigisoftware.com/cydia/


Install Filza file manager.


Navigate to this location – /Library/MobileSubstrate/DynamicLibraries.


Tap Edit, select all files and tap Move.


Go to this location – /usr/lib/TweakInject


Paste the files you copied in step 4 here.


Navigate to /Library/MobileSubstrate again and delete the DynamicLibraries folder.


Tap Edit > More > Symbolic Link.


Go to /usr/lib/ and select the TweakInject folder.


Rename the TweakInject symlink present in /Library/MobileSubstrate folder to DynamicLibraries. Remember, you must rename the symlink, not the original folder.


Reinstall Tweak Injector and PreferenceLoader packages from Cydia.


Now tweaks will appear in your Settings as soon as you restart the Springboard.


Sponsor Ads:


Gihosoft Free iPhone Data Recovery is a professional iPhone Data Recovery software to get back all your lost text message, photo, video, call history, note, contact and more from iPhone/iPad/iPod Touch.
Gihosoft Android data recovery Free is a super awesome software specialized in Android file recovery. With this program, you are able to recover deleted photos, music, videos, messages, contacts, call logs, WhatsApp messages, Viber chat history and more from Samsung, Huawei, LG, HTC, Motorola, Google, Oneplus, Sony, Lenovo, ZTE and other Android devices directly. Meanwhile, this Android data recovery software is available for both Windows and Mac platforms.

Saturday 16 June 2018

How to Sync Music from iTunes to iPhone


How to Sync Music from iTunes to iPhone


Part 1: What Can You Sync with iTunes


Music: Various songs can be synced with iTunes. If you use any iOS devices, you can move your music around.


Video: Movies can be synced with iTunes as well.


Playlist: Playlist too can be synced with iTunes.


In addition to the above, you can also sync podcasts, album, etc. with iTunes. Some iOS users often use various methods to sync with iTunes. However, experience has shown that using a reliable third-party application is better.
Part 2: How to Sync Music from iTunes to iPhone


If you want to sync music from iTunes to your iPhone, Apple has easiest steps you can follow. Follow the steps below to get it done.


Switch on your PC and connect your iPhone.


Go to iTunes library.


Choose the songs you want to sync to your iPhone.


Then drag the songs to your iPhone at the left sidebar.


The above steps will help you sync music from iTunes to iPhone. However, you may not be able to sync all songs at the same time. Some users have experienced difficulties when trying the above for other purposes such as trying to sync some playlists or free and paid music. But, there is a software application that is not limited by any iTunes challenge. Sponsor Ads:


Gihosoft iPhone Data Recovery is a professional iPhone Data Recovery software to get back all your lost text message, photo, video, call history, note, contact and more from iPhone/iPad/iPod Touch. It offers a full solution to recover your lost data in different tough situations. Besides recovering data directly from iPhone, iPad and iPod touch, it also allows you to recover data from iCloud and iTunes backup files.
Must Read:If you lost data after you updated to a new iPhone, you can always use Gihosoft iPhone Data Recovery to get the data back from the old iPhone or backup.
Gihosoft Free iPhone Data Recovery:iphonerecovery.com
If you use android phones, please choose Gihosoft Android Data Recovery


Monday 11 June 2018

iPhone Locked after Update? Unlock iPhone with iTunes

iPhone Locked after Update? Unlock iPhone with iTunes

If your iPhone locked up after update, you can also unlock it with iTunes. This method is directed to those ones who synchronize their iPhones with iTunes. It’s also important to remember that you will lose any previous data if you’re using this method.
Actually, unlocking your iPhone with iTunes actually means erasing the whole device so you can also erase the passcode. For restoring your device with iTunes, follow these steps:
  1. Connect your iDevice to the computer you use for sync.
  2. Open iTunes (if you’re asked for a passcode, try recovery mode or another computer where you synced).
  3. Wait for your iPhone to recognized with iTunes.
  4. When it’s recognized, select it from the iPhone icon and then go to “Summary”. click on “Restore iPhone”.
  5. iphone-icon
  6. After clicking on it, just keep continue to restore your iPhone. When it finishs, your iPhone lock will be removed.
  7. restore-iphone
  8. 2 iPhone Locked after Update? Unlock iPhone Using Recovery Mode

  9. In case you never synced your iPhone locked after update to any computer, you can still restore it with the recovery mode method. This method will also erase all the data on your iPhone.
    1. Connect your iPhone to your computer. Launch iTunes.
    2. Turn off your iPhone first, then you can put your iPhone into Recovery Mode.
    3. For iPhone 8, iPhone 8 Plus, iPhone X: press and quickly release the volume up button. Repeat with the volume down button. Finally, press and hold the Sleep/Wake button and you’ll see the the icon "Connect to iTunes"
    4. For iPhone 7 or 7 Plus: press and hold the Sleep/Wake button and the volume down button at the same time and keep pressing until you see the icon "Connect to iTunes".
    5. For iPhone 6s or earlier: press and hold the Home button and the Sleep/Wake button at the same time and keep holding until you see the icon "Connect to iTunes".
    6. After connect your iPhone to the iTunes. It will detect that your iPhone is in the recovery mode.
    7. A message will show up and tell you that your iPhone is detected in recovery mode and you should restore it before you can use it.
    8. Just click "OK" and it will be automatically recovered.
  10. itunes-detect-recovery-mode
  11. With these methods, you’ll be able to unlock your iPhone and iPhone locked up after update will no longer a problem.
Sponsor Ads:
Gihosoft iPhone Data Recovery is a professional iPhone Data Recovery software to get back all your lost text message, photo, video, call history, note, contact and more from iPhone/iPad/iPod Touch. It offers a full solution to recover your lost data in different tough situations. Besides recovering data directly from iPhone, iPad and iPod touch, it also allows you to recover data from iCloud and iTunes backup files. What's more, it supports Smart Recovery modes that can find your iPhone data quickly.https://www.gihosoft.com/iphone-data-recovery-free.html


iPhone 8 Battery Draining Fast All of a Sudden? Here’s the fix


Turning on Background App Refresh may drain the battery level.
  1. Go to Settings->General->Background App Refresh.
  2. Tap “Background App Refresh”.
  3. Select “Off” from 3 options (Off, Wi-Fi, Wi-Fi & Mobile Data).
Solution 2: Hard Reset/Force Restart
  1. Press the Volume Up Button and release it.
  2. Press the Volume Down Button and release it.
  3. Press and hold the Side Button (Sleep/Wake) until the Apple Logo appears.
Solution 3: Check Battery consumption for Apps
  1. Launch Settings->Battery.
  2. Under “BATTERY USAGE”, you can see the battery consumption for each app. Find which one (app) makes your battery draining so fast.
Solution 4: Turn off “Auto-Brightness”
  1. Launch Settings->General->accessibility->Display Accommodations.
  2. Toggle off (turn off) Auto-Brightness.
Solution 5: Reduce the Brightness
  1. Go to Control Center.
  2. Adjust the brightness level.
Solution 6: Turn on “Low Power Mode”
Low Power Mode reduces power consumption. When it is on, Background App Refresh, Mail Fetch, Hey Siri, some visual effects, and automatic downloads will be turned off or reduced.
  1. Go to Settings->Battery.
  2. Turn on “Low Power Mode”.
Solution 7: Check for Software Update
  1. Connect your iPhone to Wi-Fi or Cellular Data.
  2. Open Settings->General->Software Update.
  3. Tap “Download and Install” if update is available.
Solution 8: Restore your iPhone in DFU/Recovery Mode
Before doing it, take a backup. Because this action will erase all data from your device.
  1. Connect your iPhone to Mac/Computer via Lightning (USB) cable.
  2. Open iTunes on PC/Computer.
  3. Make sure that iTunes is updated to the latest version.
  4. press the Volume Up Button and release it. Then press the Volume Down Button and release it.
  5. Press and hold the Side Button (Sleep/Wake) until you see the Recovery Mode screen (iTunes screen).
  6. Select “Restore” in the pop-up box. Wait until the process is finished.
  7. After restore finishes, set up your iPhone.
Note: Don’t leave the Side Button after seeing the Apple Logo. Keep holding it until recovery mode screen appears.
Other solutions:
  1. Replace the battery.
  2. Uninstall third-party apps.
  3. Factory Reset/Restore.
  4. Check Apple warranty status. If your iPhone covers warranty, take it to the Apple Service Center.
  5. Make an Apple genius bar appointment.
If you know any other solutions to fix this issue, let us know through your Commands.
Sponsor Ads:
Gihosoft iPhone Data Recovery is a professional iPhone Data Recovery software to get back all your lost text message, photo, video, call history, note, contact and more from iPhone/iPad/iPod Touch. It offers a full solution to recover your lost data in different tough situations. Besides recovering data directly from iPhone, iPad and iPod touch, it also allows you to recover data from iCloud and iTunes backup files. What's more, it supports Smart Recovery modes that can find your iPhone data quickly.https://www.gihosoft.com/iphone-data-recovery-free.html